Preface
This guide is for people who have:
- An ikea matter device https://www.ikea.com/global/en/newsroom/retail/the-new-smart-home-from-ikea-matter-compatible-251106/
- NO hub, as they’re almost $70 USD
- An ESP32-C6 or ESP32-H2 [I used ESP32-C6 Xiao(https://wiki.seeedstudio.com/xiao_esp32c6_getting_started/)
- An already working home assistant
The confusing nature of matter,thread,hubs, openrouter etc is very confusing.
We will be turning our ESP into a Thread Border Router which allows us to connect devices to our home assistant.
Thread/Matter are a little confusing so all you need to know is:
- Matter is the protocol, e.g. “HTTP”, “MQTT”,”gRPC”
- Thread is the connection, e.g. “WiFi”, “Bluetooth”, “Zigbee”
The ikea devices, or at least the one I’m using, cannot use WiFi, only Thread, so the use of a “hub” is required.
This guide is a re-iteration of this post: LINK HERE, with the reason I’m making this, as I had no idea I wanted a “Thread Border Router”
For me, the distrobox method on the link above didn’t work due to permission issues, so I did it on my host OS (arch). If are not on Arch, I highly recommend using the distrobox version above, if you have permission issues (in the flashing step) try this instead.
sudo usermod -aG dialout $USER # Will probably fail, as arch uses the next command
sudo usermod -aG uucp $USER
LOGOUT PLEASE LOGOUT
Read above, then do it, then come back. I promise it’s necessary.
If you logout and type groups and you see uucp or dialout, you’re good to go.
Must be on a python version above 3.8, 3.9 worked for me.
sudo pacman -S git python python-pip libusb cmake base-devel
mkdir -p ~/projects/esp-thread # can change
cd ~/projects/esp-thread
rm -rf cheap-esp-tbr && mkdir cheap-esp-tbr && cd cheap-esp-tbr
git clone -b v6.0-beta1 --recursive https://github.com/espressif/esp-idf.git .
./install.sh esp32-c6
source ./export.sh
cd examples/openthread/ot_rcp
export LC_ALL=C.UTF-8 TERM=xterm
If you are using an ESP32-C6:
idf.py set-target esp32c6If you are using an ESP32-H2:
idf.py set-target esp32h2Menu configuration
idf.py menuconfig Navigate to:
- Component config —>
- OpenThread —>
- Thread Core Feautures —>
- Thread Radio Co-Processor Feature —>
- The RCP transport type —>
- Select “USB” Save and quit via: s,esc,q ( save if prompted)
- The RCP transport type —>
- Thread Radio Co-Processor Feature —>
- Thread Core Feautures —>
- OpenThread —>
(Click below to expand)
Optional but recommended step for ESP32-C6:
Plug in your external antenna, do not do this step if you don't have an antenna as you can burn it out. Edit the file main/esp_ot_rcp.c via: ( or your favorite editor)vi main/esp_ot_rcp.c/*
* SPDX-FileCopyrightText: 2021-2025 Espressif Systems (Shanghai) CO LTD
*
* SPDX-License-Identifier: CC0-1.0
*
* OpenThread Radio Co-Processor (RCP) Example
*
* This example code is in the Public Domain (or CC0-1.0 licensed, at your option.)
*
* Unless required by applicable law or agreed to in writing, this
* software is distributed on an "AS IS" BASIS, WITHOUT WARRANTIES OR
* CONDITIONS OF ANY KIND, either express or implied.
*/
#include <stdio.h>
#include <unistd.h>
#include "esp_event.h"
#include "nvs_flash.h"
#include "esp_openthread.h"
#include "esp_ot_config.h"
#include "esp_vfs_eventfd.h"
#if CONFIG_ESP_COEX_EXTERNAL_COEXIST_ENABLE
#include "ot_examples_common.h"
#endif
#if !SOC_IEEE802154_SUPPORTED
#error "RCP is only supported for the SoCs which have IEEE 802.15.4 module"
#endif
#define TAG "ot_esp_rcp"
#include "driver/gpio.h"
#include "freertos/FreeRTOS.h"
#include "freertos/task.h"
static void xiao_select_external_antenna(void)
{
gpio_set_direction(GPIO_NUM_3, GPIO_MODE_OUTPUT);
gpio_set_level(GPIO_NUM_3, 0);
vTaskDelay(pdMS_TO_TICKS(100));
gpio_set_direction(GPIO_NUM_14, GPIO_MODE_OUTPUT);
gpio_set_level(GPIO_NUM_14, 1);
}
extern void otAppNcpInit(otInstance *instance);
void app_main(void)
{
xiao_select_external_antenna();
// Used eventfds:
// * ot task queue
// * radio driver
esp_vfs_eventfd_config_t eventfd_config = {
.max_fds = 2,
};
ESP_ERROR_CHECK(nvs_flash_init());
ESP_ERROR_CHECK(esp_event_loop_create_default());
ESP_ERROR_CHECK(esp_vfs_eventfd_register(&eventfd_config));
#if CONFIG_ESP_COEX_EXTERNAL_COEXIST_ENABLE
ot_external_coexist_init();
#endif
static esp_openthread_platform_config_t config = {
.radio_config = ESP_OPENTHREAD_DEFAULT_RADIO_CONFIG(),
.host_config = ESP_OPENTHREAD_DEFAULT_HOST_CONFIG(),
.port_config = ESP_OPENTHREAD_DEFAULT_PORT_CONFIG(),
};
ESP_ERROR_CHECK(esp_openthread_start(&config));
}Flashing
Plugin your esp32, I personally held down boot as I plugged it in to ensure it went into flashing mode. ( Tiny B button) Verify your device is there via:
ls /dev/ttyUSB* # or /dev/ttyACM* If the above command has nothing, try ls /dev/tty* and see if you have anything that isn’t /dev/ttyX or /dev/ttySX where X is a number
Then flash it via:
idf.py build flashIf you’re having permissions issues, try to verify your group via groups and if you’re not in uucp or dialout, re-run the commands at the start, logout, then try again.
Connect to Home Assistant
You need to plug the ESP32 into your home assistant box, via USB. If you’re using a VM, pass through the device, I’m using a TruenasVM my settings were as follows:
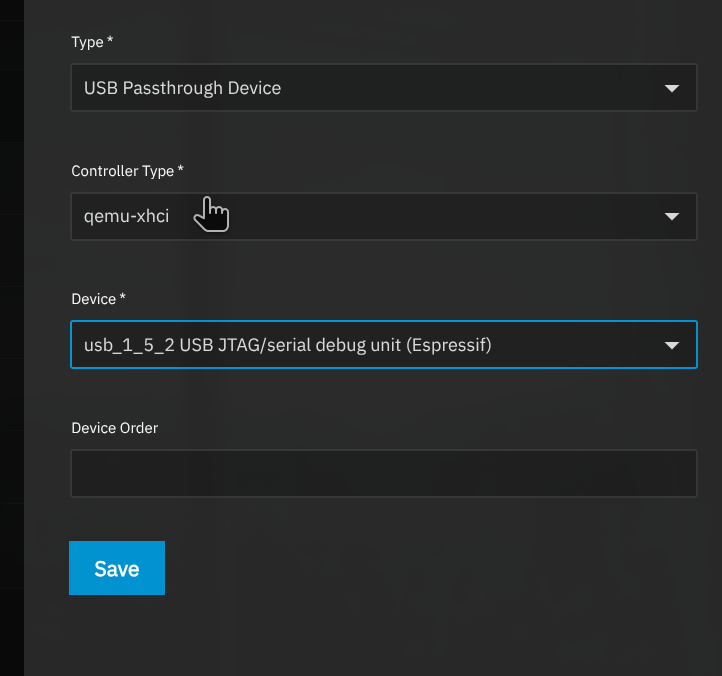
Restart your VM if you’re in one, then if you’ve installed any other Open Thread Border, Thread Border Router or Matter integrations, remove them. ( Assuming they’re not already being used)
Install the addon from This link
Before you start it:
- Go to configuration, and set the device to the /dev/serial/by-id/usb-Espressif…. option, NOT the /dev/ttyAMA option
- Disable Hardware Flow Control
Start the addon.
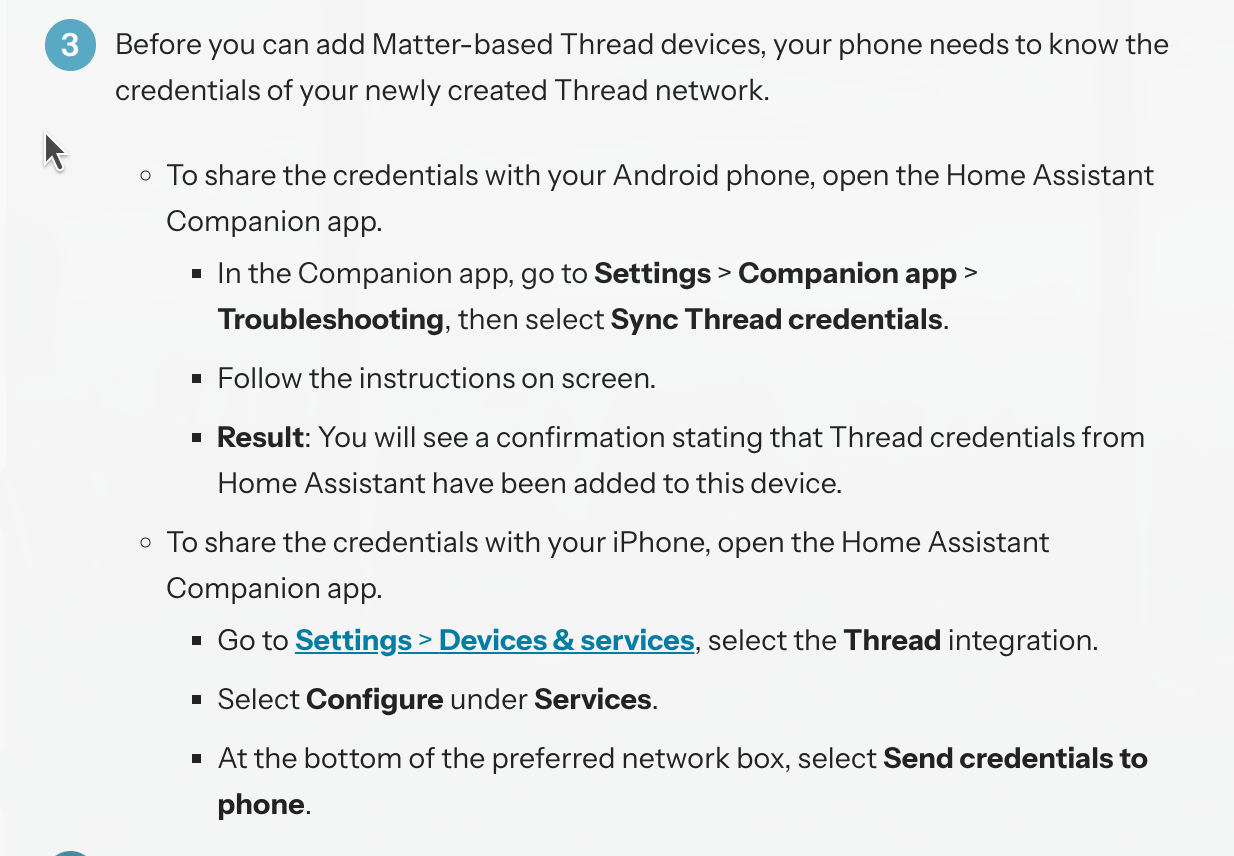
Now you’ll need your mobile device, and to follow step three HERE
After this, restart your home assistant app, and follow the steps HERE
If you’re having issues, try the following steps:
- Verify that the flashing worked, and you didn’t get an error during flashing earlier
- You’re on a python version above 3.8
- You’ve restarted your app, and done step 3 here
- Make sure you’re on your local wifi with no Tailscale, VPN, etc
Otherwise, you should have your device working! If you have any issues, please feel free to contact me and I’ll be more than happy to help.